Friday, December 31, 2010

Thanks, Honey. And thanks, freezer.

Every once in a while, my sweet hubby forgets to communicate an important piece of information. For example: we were invited weeks ago (by his friends through an email to him) to a New Year's Party, and I had asked Hubby if we were told to bring anything. He said, "no". This morning, when re-reading the email, he announced that we need to bring a dessert or finger food.  Thanks, Honey. I wasn't really planning on cooking today. And I wasn't really feeling very creative. And I had a gazillion other things I was planning to do today.

So I took a little peek in the freezer. Surely with all of my Christmas delights and my baking frenzies during the holidays I had something wrapped up and tucked away in the freezer. Surely there was something I was saving for a rainy day, saving for a day when I was overwhelmed by a sweet treat craving. My freezer didn't disappoint.  There were three treasures (!) :  an unbaked pie crust in the pie pan, ready to be filled, a foil packet of 9 chocolate mint cheesecake bars (see my "Taking Christmas to the Cabin" post), and some snowflake sugar cookies waiting to be decorated.

Since I was just on my Winter decorating spree the other day, I decided to decorate the snowflakes. Yesterday I bought some little edible mini-pearls on Christmas clearance (which I was so excited about), and thought I'd use them on my winter-y treats. What a relief to have some things in the freezer. My freezer treasures have saved me on many occasions! That is why I love freezer meals, desserts, snacks, coffee cakes. The dreary, gloomy January days can be a great time to cozy up in the kitchen and do some cooking and baking and get the freezer stocked with treasures. You never know when you're going to need a little something from the freezer. Thanks again, freezer.
In the new year, as you are getting your kitchen organized, go through your freezer and get things in there organized too. You'll need to make room for the freezable treats and eats that I'll be telling you about in 2011. We'll start the year with organizing tips for the kitchen, so get ready to clean out and ORGANIZE.


Happy New Year!

Wednesday, December 29, 2010

Saying goodbye to Christmas

When it gets to the end of December, I can never bear to un-decorate. Everything looks so festive during the month of December. Then after Christmas, the decorations come down and suddenly everything looks so ...empty. And the emptiness just magnifies the fact that Christmas is over and everything is back to normal. So,  in my efforts to avoid the empty-looking house that results from twenty-seven  gigantic Rubbermaid tubs'-worth of Christmas decorations being packed away, I like to decorate a teensy tinsy bit for WINTER.

The first thing I do is switch out the red and green Christmas wreath on the front door. I replace it with a silvery, icy, winter-looking one. This doesn't take much effort since I just pull it out of the wreath box from last year (!).


The other thing I do is replace the decor in a few key decoration spots like the mantle, coffee table, or dining room table. It just helps me not go into shock after Christmas. It's fun to still have some special decorations around the house.  I  have a few random snowflake decorations and snowmen-themed things that I like to put out as well.

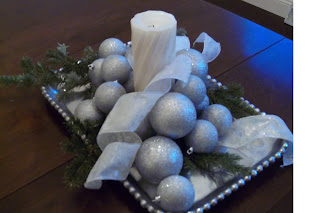
One of the simple centerpieces I did this year was  using a silver tray and silver Christmas ball ornaments.I centered a white, glittery pillar candle on the tray and put a few small evergreen clippings on the tray (to keep the balls from rolling all over the place). Then I just stacked and arranged two sizes of glittery, sliver balls and put some white and silver wired ribbon on the tray.


It's one step in the direction of un-decorating. It helps me to say goodbye to Christmas and all the beauty that Christmas decorations add to my home. During the gloomy, blah days of Winter ahead, it will be nice to have a little silvery  S P A R K L E  around the house. I think a few Winter decorations are a perfect transition from Christmastime.

And of course, there are Winter treats on my mind too, so be sure and check back... There's nothing quite like cooking up some treats in a cozy kitchen-- with a few Winter decorations around just to keep me cheery!


Tuesday, December 28, 2010

Cheesy New Year

New Year's Eve is right around the corner. I hate to admit it, but I am a little relieved that I am not hosting a New Year's Party this year. I just made a promise to Hubby that I wouldn't host any parties, dinners, brunches, lunches, or ANYTHING  for the whole month of January. This is to allow us to get completely unpacked and settled in, since that was hard to do when I was cooking and decorating practially  non-stop for 4 weeks.

Even though technically a New Year's Eve Party is in December, it does creep into January, so I decided to forego a party. Despite the lack of hospitality for the month, I will still be transitioning my decorations around the house from Christmas to New Years/ Winter decorations, so keep watch for that. AND I want to share a  recipe for Baked Brie that I love to have on New Year's Eve--in fact,  I just might make it even though I won't have a party.

I recently made this at my parents house at Christmas as an appetizer, and it was popular with both the adults and the kids. I love it because it is super easy to make, but seems a little impressive somehow. I didn't take photos of this one because my grocery store messenger (who will remain anonymous) brought home Pepperidge Farms "Puff Pastry Shells" instead of "Puff Pastry", and the shells just didn't make a beautiful Brie that the pastry sheet makes. I tried rolling out and pinching together the thawed shells, but they separated in the baking and made somewhat of a lumpy-looking mess.  (I should have taken a photo for your amusement.). Interestingly, it still tasted so delicious that no one really commented about it's unusual appearance.

Baked Brie is basically a large piece of cheese that is topped with fruit preserves and wrapped in puff pastry dough. The cheese becomes soft, the dough browns, and you cut off pieces to serve with crackers or apple slices. Yummy. It is great as an appetizer, part of a buffet table, or on the coffee table during movie night or sports games on TV!   There are lots of variations-- but here's how I do it.

Baked Brie

1/2 package thawed Puff Pastry (1 sheet)
8 oz round Brie
1/4 cup fruit preserves (rasperry, apricot, blackberry....whatever you like or have in the fridge)
1 egg
2 T water

Preheat oven to 425. Grease cookie sheet. Roll out puff pastry slightly. Place cheese (with rind on) in center of dough. Spoon preserves onto cheese. Bundle puff pastry up around cheese and preserves, pinching to seal.  Beat the egg and water together to make an egg wash and brush over the dough (you will not use entire egg wash). Bake 20-25 minutes until golden. Remove from oven and cool for 5 minutes. Serve with crackers and/or fruit wedges.

Enjoy!

Friday, December 24, 2010

The Elf on the Shelf

It's Christmas Eve! Every family has its own traditions, and one of my family's fairly recently-started traditions is the Elf on the Shelf. Several years ago I found out about this little elf and the book that he comes with, documenting his story.(I've seen these all over the place this year... Barnes and Noble, Amazon.com., Target...) The elf arrives at our house at the beginning of December and hides somewhere central in the house so that he can see and hear what's happening in our home. Then each evening he flies back to the North Pole to report what he's seen and heard  to Santa. In the morning, he is back at our house in a new hiding place.

 The fun for my kids is looking for him each morning. The fun for the parents is using the Elf to try to encourage good Christmastime behavior (" The elf is watching you... you'd better be nice!") . The parents also have fun coming up with creative hiding places for the Elf.  Even though we celebrate the birth of Jesus at Christmas and know that THAT is the true reason for the season, our family does have fun with the Santa tradition as well, and our kids love Santa's little messenger, the Elf on the Shelf.

At our house, the Elf had various opportunities to hide in half-unpacked boxes, since there are still plenty of them around after our move. The Elf also likes to get a bird's-eye view from higher up!


Whatever your family traditions, I hope that you enjoy the next few days of your holiday.( I'll be back in a few days with more treats and ideas for New Years!) Merry Christmas to you and your family!

Wednesday, December 22, 2010

It's just part of the tradition

So, we had a little mishap in the kitchen today- in Mom's kitchen. Every Christmas  my mom makes Buttermilk Pralines which are D E L I C I O U S.  And every Christmas, there is a batch of Pralines that doesn't turn out quite right. They're either overcooked or undercooked, too clumpy or too runny. But despite this recipe requiring the use of a candy thermometer and careful monitoring, Mom always makes them, makes another batch when they don't turn out, and we always arrive at her house and search among all the cookie tins until we find the tin containing the golden deliciousness.

I'm not always at my parents' house for the adventure of the Praline-making. This year I was there, along with my sister, and there was something exciting  about watching the candy thermometer and wondering if this would be the batch that would turn out the first time.

I won't be sharing mom's Praline recipe. The reason may be obvious; I don't want to share a recipe that isn't reliable. (Although our family makes the Pralines, loves them, and risks the mishaps year after year, some people wouldn't have the patience for that!) The point of my writing today is to share my thoughts during the praline-making.

Part my memories of Christmas include the Pralines. Part of our Christmas tradition is the making of (and eating of) the Pralines. And even the mishaps and failed batches are a part of the memories and the tradition.  This year, some of the festivity for me was being in the kitchen with my mom and sister, with  kids running in and out, while we wondered whether the Pralines would turn out. I think my mom was getting a little frustrated, but even that is part of the tradition.  Being  together in the kitchen is one of  our family's favorite traditions. We've made many memories in the kitchen. That's probably one of the reasons I like to spend so much time in the kitchen now--making classy treats.  And even if the treats don't turn out quite right, sometimes that just becomes part of the tradition.

Monday, December 20, 2010

Classy cocoa for kids AND grown-ups!

Usually, classy has a lot to do with the presentation. There's nothing special about this hot cocoa--  no special recipe, no secret ingredients. But I can guarantee you it will taste better because it's in a fancy,    festive mug, with whipped cream, cocoa powder sprinkled on top, and a peppermint stick. (I just broke off the curved part of a candy cane and stuck that end in the mug with a smooth end sticking out) This would also be a good opportunity to use my little chocolate shapes-- I could stick one of them into the whipped cream.

The Christmas season is a fun time to be creative and make special, classy treats out of ordinary treats. (Are treats ever ordinary?) Kids and grown-ups alike will enjoy a cup of fancy hot cocoa this Christmas. There's just something about Christmas. There's just something about sitting around the Christmas tree or around the kitchen table with family and friends. There's just something about spending a little extra time to make memorable holiday treats.

Sunday, December 19, 2010

Chocolate should never be wasted


We had a little chocolate left from our recent truffle extravaganza. It was just sitting, hardened,  in the bottom of the Pyrex measuring cup on the kitchen counter because I couldn't bear to throw  it out. I wasn't quite sure to do with it, but I knew that I needed to do something with it.  I decided to put it in the microwave to soften it. I stirred it, and then the kids and I made shapes out of the melted chocolate. We did this by scraping out the Pyrex cup and pouring the chocolate into a plastic Ziploc bag. We cut a tiny hole in the corner,  then we squeezed out little shapes onto waxed paper. The shapes  hardened on the waxed paper and  can be used to decorate cupcakes, stick into whipped cream on the top of ice cream or other desserts, or even just nibbled as little candies.


I'm not sure how we want to use them, so I put the chocolate shapes into an airtight container in the fridge to save until I come up with a specific way to use them to create a special  treat. It's little things like these chocolate shapes that can make a regular treat into a classy treat.

I like having my little fancy chocolate shapes in the fridge, ready to use in a special way. After all, chocolate should never be wasted.

Friday, December 17, 2010

A few spare cranberries are decorating my house

Or I am decorating using them, I should say! Remember my Cranberry Upside Down Cake? Well, I had some extra cranberries around and wanted to use them as decorations. There are easy ways to use them that don't require an ounce of talent, which I know is encouraging for some of you! Some of these include: putting cranberries into candle holders around a candle, floating them in water in a shallow glass dish with floating candles, or even just setting individual berries in clusters on a windowsill or shelf with other decorations. The stringing of cranberries always sounded fun to me, but is a tad messy. It is a fun thing to do and then hang the strings on tress outside for the birds to enjoy during the holidays; but it is very time consuming. Maybe this would be a good project to keep the kids busy during the holidays!? Below are a few pictures of what I came up with for my decorations. Be creative. Have fun.


Thursday, December 16, 2010

A truffle for you and a truffle for me!

As you may have noticed, every few days I have to involve myself with chocolate in one way or another. The holidays give me a perfect excuse, since I am always "making gifts".  Just about every experience with chocolate turns out to be a messy one for me. When I bake alone, the messy factor is significantly decreased, but today was an exception. Today's excitement involved the Pyrex measuring cup (full of melted chocolate) somehow tipping over in the microwave.    Not only was much chocolate spilled, but I felt it would be dangerous to lick out the microwave, so much chocolate was wasted.

I have a truffle recipe from my newlywed days with a gazillion notes on the edges, that I decided I should completely recopy so that it is more legible. While I was at it, I decided to make some of the tasty treats since it had been a while. These aren't your easy-throw-everything-into-a-bowl-and-then-form-them into-balls type of truffles, so be forewarned. But you should also know that my note at the top of the recipe card says : "takes a little time, but it's worth it!"

These truffles have a soft center and a crisp chocolate shell around them. Although they have "caramel" in their name, the caramel is mixed into the chocolate and gives the chocolate a slight caramel flavor, but is not a true caramel center. (I usually don't even mention the caramel part when I give these as gifts). These do have to chill several hours and then again overnight, so plan accordingly. And be self-controlled. It is hard to resist these!


Dark Chocolate Caramel Truffles
makes about 20

14 oz. bittersweet chocolate,  chopped and divided
2/3 c. granulated sugar
4 T water
3 drops lemon juice
2/3 c. heavy whipping cream
1/4 t. sea salt

Place 8 oz chocolate in Pyrex measuring cup and microwave for 45 seconds at half power. Remove and stir until smooth, microwaving another 30 seconds if needed.  Set aside.

Combine sugar, water, and lemon juice. Stir over low heat until sugar is dissolved. When sugar is dissolved, increase heat to medium, STOP STIRRING, and allow to come to a boil. Do not stir at all during this time. It will turn a deep amber color. This takes about 4-6 minutes.  Let caramel mixture boil and  begin to smoke slightly before adding cream and removing from heat. Mixture will bubble after cream is added. Put pan on a different burner on stove, turn to low, and stir until caramel is smooth, an additional 3-4 minutes. Add salt to caramel. Mix with melted chocolate and pour into shallow baking dish to cool. Refrigerate until firm, about 2 hours.

Using a small spoon and working quickly, scoop up truffle filling and form into balls. Keep a bowl of ice water (and some paper towels!) nearby to rinse hands in if filling begins to melt in your hands when forming truffles. Truffles should measure about 3/4 inch in diameter. Arrange on a baking sheet, cover, and chill 8 hours, or overnight. Truffles will still be a little soft after chilling.

Line a baking sheet with foil. Place remaining 6 oz chocolate in 1- cup Pyrex measuring cup. Microwave at half power for one minute, stirring until smooth. Microwave again until chocolate reaches 115 degrees on a candy thermometer. Working quickly, submerge one truffle in the melted chocolate. Using a fork as a scoop, quickly lift out the truffle and tap fork against side of cup so that excess coating can drip off. Transfer truffle to baking sheet. Repeat with remaining truffles. Refrigerate for one hour before packaging. Can be made 1 week ahead. Bring to room temperature before serving.

Enjoy!

Wednesday, December 15, 2010

Cranberries are so Christmasy

Cranberries are such a Christmasy fruit. In fact, the Christmas season is really the only time I ever was aware of cranberries until their deflated friends, the Craisins, became so popular.  In keeping with my excitement about the holidays, I decided to try a cranberry cake that sounded yummy but also seemed  to be dual-functional-- it can serve as a dessert cake or a coffee cake. But then, I can eat just about any cake as a coffee cake. (It runs in the family: my sister has been known to start her day with a cup of coffee and a slice of rum cake from the night before!)

This is an old recipe I had printed up online several Christmases ago but never got around to making.   It turned out to be a tasty coffee cake. The kids were thrilled to wake up to a special breakfast, although they questioned why there was a piece missing. Hmmmm.... someone must have sampled a piece last night while it was still warm and even more delicious! As a dessert, I would serve each piece topped with a dollop of whipped cream. You do taste the tartness of the cranberries, and the whipped cream softens the tartness a little.


Cranberry Upside Down Cake
serves 8-10

1 1/2 sticks butter, softened
1 c. all purpose flour
2 3/4 fresh cranberries (or frozen but defrosted)
1/2 c. maple syrup
1 t. cinnamon
1 t. baking powder
1/4 t. sea salt
1/4 c. finely ground almonds
3/4 c. granulated sugar plus 2 T
3 large eggs, separated
1/2 t. vanilla extract
1/2 t. almond extract
1/2 c. milk

Grease and flour an 8 inch, round cake pan. In a large skillet over medium heat, melt 6 T butter.Add cranberries and cook until cranberries are shiny, about 3 minutes. Add maple syrup and cinnamon and cook until cranberries soften, about 5 minutes. Remove from heat and stir mixture to cool slightly, about 5 more minutes. Pour into prepared pan, arranging cranberries so that they cover the bottom of the pan.

Preheat oven to 350. In small bowl, sift together flour, baking powder, and salt. In a medium bowl beat remaining 6 T butter until smooth. Add almonds and beat until combined. Gradually add 3/4 cup sugar and beat until creamy. Add egg yolks, vanilla, and almond extract and beat until combined. Add half of the flour mixture and half of the milk. Beat until combined, and add the remaining flour mixture and milk.

Using an electric mixer, beat egg whites until foamy. Slowly add remaining 2 T sugar  and beat until soft peaks form. Whisk a third of the whites into the batter, then fold in remaining whites.

Spread the batter over the cranberries and bake for 45 minutes, or until toothpick inserted into the middle comes out clean. Remove from oven and place on cooling rack. Carefully run a knife around the edges of pan. Allow to cool in pan for 1 hour. Run knife around edges of pan again after one hour and invert onto serving plate.  Best if eaten within 2 days.

Enjoy!

Tuesday, December 14, 2010

The turkey made his reappearance

Remember the Thanksgiving turkey leftovers that I put right into the freezer? Well, some of those leftovers were used in a soup that was so simple it could have been from a can (almost).  This is a crazy-busy week for me, as many December weeks are.  I wasn't in the mood and didn't have the time to spare making anything time-consuming for dinner, not to mention the fact that I had minimal groceries in the house to work with. So Mr. Frozen Turkey made his appearance today. And he was greatly appreciated. (I even threw the turkey right into the soup pot still frozen. No thawing necessary! )

I am fortunate to be in a family of soup-lovers, and we could probably eat soup twice a week. And sometimes we do.  Soup with salad or bread or both is just so cozy on cold days!  I 've never really liked the term  "comfort food " (maybe it's the therapist in me...), but this would definitely qualify. I had leftover rice and I had this sliced turkey that was cooked, but frozen, and I was able to make a quick and delicious soup for dinner in no time. We even have enough for another meal. My kids proclaimed that the soup tasted like it was from Panera-- so you know it had to be good!


Lazy Turkey Soup
serves 6-8

3 T olive oil
1/2 c. onion, finely chopped
1 c. celery, chopped
1 c. carrots, chopped
2 garlic cloves, minced
3 c. cooked turkey (or cooked chicken), shredded or cut into small pieces
2 c. cooked rice
2  32 oz cartons of chicken broth or stock


Saute onions, celery, and carrots in oil until tender, about 10 minutes. Add garlic and cook about 5 minutes longer. Remove from heat. Put turkey, rice, and vegetables into large pan. Pour in broth. Cook on medium heat until warmed through, 15-20 minutes. Serve with bread.

Enjoy!

Monday, December 13, 2010

An apple a day...

You've probably  heard the saying "an apple a day keeps the doctor away". I don't think these yummy apples are quite the type being referenced... but then again, they might just do the trick! My Fancy Caramel Apples got their share of chilling in the fridge, I placed each one in the center of a square of cellophane and tied festive ribbon around the top. The deliveries of these little Christmas gifts started today! After everyone here had his sample, of course.


Fancy Caramel Apples
makes 8

(READ ALL DIRECTIONS BEFORE BEGINNING)

8 small to medium sized apples
24 oz milk chocolate (chips or bars, chopped)
12 oz white chocolate (chips or bars, chopped)
16 oz. chopped pecans, optional
2 14oz. tubs caramel (I use Concord Foods brand)
8 thick long wooden skewers (found at restaurant supply stores or craft stores)

Wash and dry apples, remove stems, and refrigerate apples for several hours before beginning. Put 2 cookie sheets in the freezer. You will put the apples on these as you make them. After each stage of dipping, each apple should go onto the tray in and be put in the refrigerator until the next dipping.

Put a skewer through the top of each apple, being very careful not to break through the skin on the bottom of the apple (or it won't last as long).

Melt caramel according to package directions.  Dip/spoon caramel onto the first apple. If using pecans (which I recommend, of course), roll apple in pecans and press pecans onto apple immediately after dipping in caramel. Put on a tray in the refrigerator and repeat with the remaining apples. Apples should chill for one hour before proceeding to the next dipping stage.

After one hour, microwave half of the chocolate on half power at 45 second increments, stirring and repeating as necessary until smooth. Be careful not to overheat chocolate or it will become clumpy. A 4-cup Pyrex glass measuring cup works well for this, as the apples can be easily dipped into the chocolate. Dip/spoon chocolate onto one apple, scraping off the bottom before placing it back on the tray in the refrigerator. Repeat with remaining apples.

Melt white chocolate. (If it doesn't become thin enough for drizzling, you can add 1 or 2 T. shortening and stir until smooth.) Drizzle across the tops of apples. This can be done with a spoon or by putting melted chocolate into a plastic bag and snipping off a tiny corner of the bag and squeezing out the white chocolate, which gives you a little more control.

Refrigerate for at least 2 hours before packaging in cellophane (bags or on a roll) and tying with a bow. Apples will keep in the refrigerator for up to 2 weeks. These are easiest to eat if the stick is removed and apple is cut into sections (as you would a regular apple).

Enjoy!

Sunday, December 12, 2010

Chillin'

Our kitchen excitement for the day (and yes, there is some almost every day) was the Fancy Caramel Apples that I was going to make for some friends as gifts. My kids heard the plan and jumped on board, volunteering to help. Many of you know that kids "helping" in the kitchen is...um, well.... not so much help. But they named some teachers they wanted to make them for, and suddenly this became a kitchen gift-making party of three. The apples didn't turn out as beautifully as I would have hoped (if I didn't have quite as much help). But we had a fun time in the kitchen together, making a royal caramelly, chocolatey mess,  and now the kids can tell their teachers  that they helped make the gift.

I will share the "recipe" for these fancy apples, and a photo of the finished products, but they are chilling in the fridge and need to do so for several hours before we can wrap them. When they are wrapped in cellophane with a bow, they look so pretty, so I want to share a photo of them after they're wrapped. You'll have to wait for tomorrow for all that. But for now, here's a sneak peek of our apples chillin'.


See you back here tomorrow for the recipe and the gift wrapped, ready-to- go Fancy Caramel Apples!


Saturday, December 11, 2010

A GREEN Christmas-- it's how I've always done it

Being "green", "going green", whatever-- is the thing to do.  Everyone likes to brag talk about it and thinks they are doing a good and noble thing by being environmentally responsible. So then they talk about it even more. I personally would be happy if people would just do what they can do to be responsible, but not talk about it quite so much. That said, I have been decorating "green" since before it was trendy. I use fresh greenery for my decorations inside and outside. I trim them from my own trees (or the neighbor's trees that hang over into our yard!), or I collect cast-off branches at the Christmas tree farm. After the holidays all of the greens I used go into the chipper/shredder and into the compost pile-- there's not much that's more environmentally friendly than that, right?! PLUS, fresh greens make the house smell like Christmas.

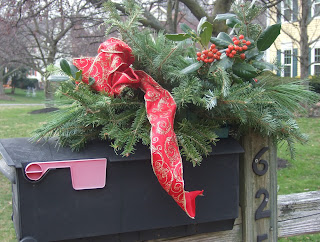
Since we are still in move-in/renovation/unpack mode, I haven't decorated as much as I normally do, but I did a little.  I decided to only do two major decorations with my fresh greens this year. One is our mailbox decoration, which my daughter promptly announced looked like a hat for the mailbox. The other is the dining room table centerpiece.

The mailbox hat was made using floral foam (soaked in water) in a plastic "cage" that could be secured with floral wire to the mailbox. I secured the cage onto the mailbox and then filled it with the greens. I just trimmed the greens I wanted: one which was the primary,  another one  which was the accent, and then some holly with berries --for some color. I put the primary branches into the foam, basically filling it. Then I went back and spaced out the accent branches throughout, and finally filled in with the holly. Then I wired a bow onto a floral pick and stuck it in toward the front center. I have no floral background (which I'm sure is noticed by those who do), and working with greens really takes no talent-- just a little experimentation and playing around with things until it looks how you want it to! 


For my centerpiece, I laid a green piece of cloth down on my table cloth (so any sap from the branches didn't ruin my table cloth), centered a pillar candle in the middle,  and placed my branches directly on the cloth around the candle. I stuck in some artificial  berries ( on floral picks)  and then put a long piece of gold wired ribbon around the greens. The great thing about a centerpiece like this is that it is quick and easy, and you can change it up throughout the holiday season by substituting different colored candles or ribbon or adding other things (pine cones, Christmas ball ornaments, other floral picks that you have on hand or find at the craft store).


 So go out and find a few greens of your own this week, and have fun GOING GREEN this Christmas!

Friday, December 10, 2010

Busy day, easy dinner!

'Tis the season to be rushing around: shopping, cooking, baking, wrapping, volunteering, working, partying, hosting, caroling, celebrating..... whew!  This is one of the times of year that it is great to have something for dinner that you don't have to think about--something easy and that does not involve going through a drive-thru!

One of my faves, other than soups that freeze well (see my previous posts) is Stromboli. Granted, it is a little time-consuming initially; but when you put it in the freezer and pop it out on a busy day to thaw and rise and it is ready for the oven when you come home that evening-- it's worth it. And Stromboli is fun because you get to "decorate" it with whatever your family likes inside! My recipe below is a guideline, but substitute whatever meats or veggies your family  prefers. (Use favorite pizza toppings as a guideline).

This recipe makes 2 Stromboli . My family of 4 (which includes two elementary kids) eats one Stromboli at a sitting, along with a salad. We usually end up eating one the day we make it and saving one for a busy day... like TODAY!

This little boli isn't very photogenic, but trust me-- it tastes delish.

Busy Day Boli

Dough:
1 cup warm water
1 (1/4 oz) envelope active dry yeast
1 t sugar
1 T olive oil (plus 2 t. for oiling bowl)
1 t. salt
3 c. all purpose flour

Boli:
3 T olive oil
1 c. thinly sliced onions (optional)
1/2 c. thinly sliced bell peppers (optional)
2 T minced garlic
1/2 t. dried oregano
1/2 t. dried basil
1/2 t. dried parsley
1/2 lb thinly sliced ham
1/4 lb thinly sliced salami
1/4 lb thinly sliced pepperoni
1/2 c sliced olives (optional)
1/2 lb sliced provolone
2 c. grated mozzarella
1 large egg, beaten
1 T water
1 c. grated Parmesan


1. In large bowl, combine water, yeast, sugar and  1 T. oil. Let mixture sit until foamy (3-5 min). Add  salt and 1 1/2 cups of the flour, mixing by hand until mixture is smooth. Continue adding flour, mixing until flour is incorporated but dough is still slightly sticky. Turn dough out onto floured work surface and knead for about 5 minutes.

2. Pour about 2 t. oil into large bowl and place dough in bowl, turning to oil all sides. Cover with plastic wrap and set in a warm place to rise until almost double in size, about 1 1/2 hours.

3. While dough is rising, saute onions and peppers until soft, about 5-7 minutes. Add garlic, oregano, basil, and parsley and cook on low for 2 minutes. Remove from heat and cool.

4. Punch down dough  and divide in half. On lightly floured surface,  roll out each half into a 10x14 inch rectangle. Leaving a one-inch border all around the dough, spread half of the sauteed vegetables on each rectangle. Overlapping slightly, layer half of the meats on each rectangle, followed by half of the olives, and half of the cheeses.

5. Mix together the egg and water to make an egg wash. Using a pastry brush, paint one long edge of each rectangle with the egg wash. Fold up the short ends each of the rectangle (to keep ingredients from falling out) and then roll up each rectangle starting with the long end opposite the egg -washed side. Pinch edge to seal. Place on greased baking sheets, seam sides down,  and allow to rise 30-45 minutes.

6. Preheat oven to 375. Brush tops of Stromboli with egg wash. Bake 20 minutes, until almost golden ** Or instead of baking, wrap in plastic wrap and foil and put in the freezer to use at another time**.

7. After 20 minutes, remove from oven and sprinkle with Parmesan cheese. Return to oven for 5-8 minutes until cheese is melted. Remove from oven and let stand 10 minutes. Slice thickly and serve with marinara sauce for dipping.

** If using a frozen Stromboli, unwrap foil  and place on greased baking sheet, still wrapped loosely in plastic wrap. Allow to thaw and rise approx 7-8 hours. Remove plastic wrap and proceed from Step 6.

Enjoy!

Thursday, December 9, 2010

Christmas cards for little hands and big hands.

It's planning time for cards and gifts for teachers, Sunday School teachers, neighbors, hostessess, mailmen, hairdressers... anyone and everyone, it seems! I started making little Christmas tree cards a few years ago as a way to use up a jar of old buttons I had. Then I loved the idea so much I had to go out and buy more buttons to make cards the next year! I buy them at the thrift shop where they are cheap. And while I am there I often stumble across star-shaped seuqins or buttons that I can also use. My kids make these for their teachers and Sunday School teachers, and they love making them as much as the teachers love getting them! They are easy enough for children to make and cute enough that moms (aunts, grandma's babysitters....) will want to make them too!

Because of the bulkiness of the buttons, extra postage is required, so I generally just give these to people we will be hand delivering to.


What you need

*blank cards and envelopes (or card stock to fold and make your own cards) -- any size is fine

*Elmer's or craft glue (buttons will not stick well with glue stick)

* 6 buttons for each card. I look for green ones, but I have done red and also white.

*star shaped buttons, sequins or stickers OR construction paper to cut out stars yourself

*brown (or any color you like) construction paper to cut out a tree trunk

I usually use a cream colored or natural card since I think the buttons look a little "country". If you want to get adventurous you could use a patterned background or whatever you like.

When working with young children (not young enough that they'll eat the buttons, of course!), I found it easiest to put drops of glue on the card where the buttons would be so that they would end up in the general shape of a tree. Kids love to make these!

So if you're looking for a craft for the kids, a craft for yourself , a way to use old buttons, or a just a new idea for cards, try these cuties out.  They're inexpensive, easy, and festive!

Wednesday, December 8, 2010

Spreading the holiday cheer

No one decorated at the office. I work part time, and for the past several years, I have been the one assigned (very willingly, of course) to decorate for Christmas since I work only part- time and have "so much time" to do things like that (?) It was something I always did on Black Friday after my marathon shopping morning. But this year I didn't get around to it.

I thought someone else in the holiday spirit would have stepped in and decorated things, but I walked in on Monday and there was NOTHING. You'd never guess it was December! So sad. My boss said that no one was going to be decorating (unless I do). I am on a super busy schedule for the next week and I just didn't know if I could squeeze one more thing in. But the more I thought about it and how the decor could really brighten things up in there for everyone, I decided I would make it a priority. One of my measures for what I prioritize is a question that I ask myself: "How will this impact other people?"

A year from now, my family won't remember that I did (or didn't do!)  the laundry today.

No one will know that I had chipped toenail polish because I didn't repaint my nails.

The cat won't remember that his litter was changed  on Thursday instead of Wednesday.

People won't care that I was driving around in a dirty car this week because I never made it to the carwash.

But chances are high that people will remember the office all decked out for the holidays, and that someone cared enough to spend time decorating. So I dragged in 3 big boxes of garland, mini Christmas trees, ribbon, pine cones,  ornaments,  lights, and Reese's Peanut Butter Trees for the candy dish, and spent some time spreading the holiday cheer around the office. And as I left, I felt pretty happy about it.

The people in the office next to ours even asked me to come and decorate for them-- you know, because I'm part- time and have so much time on my hands.

Tuesday, December 7, 2010

You can't go wrong with butter and sugar


So, you probably think I am going through another phase. This time with mint. But I'm not-- I promise. I am making some mints for a wedding; otherwise I might have waited a few more weeks to make these melt-in-your-mouth yummy treats that have become a Christmas tradition at our house.

Several years ago I decided to make these mints with my kids. I am always on the lookout for candy that doesn't require using a candy thermometer (since I generally find a way to mess up entire batches of candy when I try using a candy thermometer),  so these NO BAKE candies looked simple and easy enough to have preschoolers help with. And now we make them every year.

They are basically the little pillow mints that I remember eating out of candy dishes at weddings when I was little. When I was little, candy was candy and it all tasted good. But as an adult, I became more discriminating about my candy, and after I made these at home, I never bought them at the store again.

The absolute ONLY issue with these is that they need to air-dry for about 2 days, which requires patience and self-control. But if you sample a few each day "just to see if they're ready", that's ok. And that was always part of the fun when I made these with my preschoolers. We would each sample one to see if they were ready. And then  we'd sample a second. Sometimes it took up to four samples before we could determine that the mints needed one more day before we transferred them to their Christmasy storage tins. It became quite a game and a fun memory. I think that's part of why my kids still love these mints so much!


Pillow mints

1 stick salted butter, softened
1 lb powdered sugar (plus about 1/4 c. for dusting)
2 T heavy cream
1 t. peppermint extract
food coloring, optional

In large bowl, beat butter until creamy. Slowly beat in sugar, cream, and peppermint until smooth.

Lightly dust work surface with powdered sugar. Turn sugar mixture out onto work surface and knead for several minutes, until smooth. If using food coloring, divide  sugar mixture into thirds and knead 2 drops of coloring into each section that you want to color. Cover with plastic wrap to keep from drying out as you work with the other sections.

Line a baking sheet with foil. Again dust work surface with powdered sugar. Working with one section at a time, roll out about 1/4 cup of the mint mixture into a rope about 1/2 inch thick. Cut into 1/2 inch pillow-shaped mints. Transfer to baking sheet, using careful fingers or a spatula. (The mints will be soft and will squash easily.) Repeat with remaining mixture.

Let tray of mints air dry at room temperature for 2 or 3 days, until firm enough to transfer to covered containers. These can be stored at room temperature (in covered containers) for 2 weeks or in the refrigerator for up to a month.

Enjoy!

Sunday, December 5, 2010

Santa's Favorite Cookie

You might think that after hosting my daughter's nine friends (aged 7-9) for a cookie decorating party on Saturday, and baking over 120 cookies for the occasion, that I would be cookied out, right? Well, RIGHT. Until, that is, I saw a cookie on a bakery's website that I just had to try to duplicate. I decided to try a batch to take into work on Monday morning. They turned out so delish, that I do believe these will be Santa's new favorite. In fact, Santa might just get so distracted by these treats that he forgets why he stopped by in the first place. I guess that wouldn't really be a good thing, but making Santa's favorite cookie of all time would be! This is basically a shortbread cookie wearing  chocolate and peppermint. Shortbread alone is superb, but the dark chocolate and crunchy bits of peppermint  make this cookie rich, festive, and one that's sure to be a new holiday favorite.

Try these out on your family, co-workers, kids' teachers, or at your next cookie exchange. Then maybe you'll want to surprise Santa with them too!


Santa's Favorite Cookie
makes about 4 dozen

3 sticks (3/4 pound) unsalted butter, softened
1 cup sugar
1 1/2 t. vanilla extract
3 1/4 c. all purpose flour
1/4 t. salt
1 T. water
12 oz. bag Hershey's special dark chocolate chips
1 1/2- 2 c. crushed candy canes (or other peppermint candy)

Beat together butter and sugar with electric mixer until combined. Add vanilla, flour, salt, and water. Mix on low speed until dough begins to come together.  Dump dough onto surface dusted with flour. Form into ball, wrap in plastic, and chill for 1 hour.

Preheat oven to 350. On floured surface, roll out dough to 1/4- inch thickness. Using  2- inch round cookie cutter, cut out cookies and place on ungreased cookie sheets. Bake 10-12 minutes until the edges begin to brown. Remove to cooling racks and cool completely.

Pour crushed peppermint into small bowl and set aside.

Pour 1 cup of chocolate chips into a 1-cup Pyrex measuring cup  (or other small microwavable bowl) and melt in microwave on medium power for about one minutes (microwaves will vary). Remove from microwave and stir. (It is important not to overheat the chocolate or it will clump and not melt smoothly.) If your chocolate needs more time, return it to microwave for additional 30 seconds as needed, being careful not to over-heat it.

Dip cookies individually halfway into the chocolate, scraping excess chocolate against side of cup,  and dip into crushed peppermint. Place on parchment paper-lined trays and allow to cool until chocolate becomes firm on cookies.  Repeat melting process with additional chocolate when needed, being sure to completely clean out Pyrex cup before pouring more chocolate chips in.

Store in airtight container.

Enjoy!

Friday, December 3, 2010

Having a (Christmas) ball!

Well, here we go! Christmas decorating is in full swing. (I lit a few scented candles and put on some Christmas music to really get into the spirit). As I have mentioned before, I love Christmas ball ornaments of all sizes, and it is just so much fun to find different ways to use them! Here are some of my favorites:

Similar to my trifle dish yesterday, here is a simple way to make a centerpiece or mantle decoration using extra Christmas balls.


 I have two of these glass cylinders that I fill and use at the ends of my mantle, the ends of a buffet table, or on bedside tables. So easy and so cute!

This one is a little more labor-intensive than just filling bowls with the balls! I found different sizes of candle holders or liqueur glasses at the thrift shop and topped each one with an ornament that I had painted a letter on. ( I used a gold paint marker, but you could also use a permanent marker or a paintbrush and paint. Or you could even stencil a letter onto the ball). Then I just tied a tiny bow on the top of the ball (where the ornament hook would go). I spelled "noel", but you could do any word: "peace", "Christmas", "love", or even your family's name.

Small Christmas balls can be tied onto gifts as  gift toppers. The person's name could be written on the ornament, or you could simply use the ornament to make the gift beautiful.

So, if you are like me, there's no way you'll ever hang every Christmas ball ornament you have on your tree, but don't just leave them packed away-- find a fun way to use them! You'll be amazed at your own creativity.

Thursday, December 2, 2010

One dish, four ways!

Well, it's a Christmas- box wonderland around here. I have boxes piled everywhere. Some are opened, some are half unpacked, and some are still closed up. And they are all full of Christmas decorations, candles, wrapping paper, gifts, and Christmas craft supplies. Just when we had all  most of the moving boxes unpacked, I am bringing out more boxes! I'll probably do a whirlwind decorating session today so that I can get the empty boxes put away again and we can feel moved in, settled, and ready for Christmas.

As I am unpacking all of these goodies, I am reminded of the versatility of so many decorations.  I will be sharing a few of my fun and simple ideas over the next several days and weeks. 95% of my decorations I have bought on clearance after Christmas, bought at thrift stores, or made myself. (Now is the time to be hunting down treasures at thrift stores and second-hand stores!)

My decoration idea for the day... one glass dish, a trifle bowl, can take on several different looks with just a few changes using items that you probably have packed in your own Christmas boxes!  You don't have to use a trifle bowl. Look around for any other glass containers that you would like to use: a vase, serving bowl ... I go in and out of my trifle-making phases, and this Christmas I probably won't be making trifle, so I will be using this dish in another way! Each of the following ideas uses a candle. As always, be careful using candles, and watch out about having flammable items in your dish.

The Candy Cane
Easy, easy, easy! Just hang wrapped candy canes from the edge of your dish! I put a red jar candle inside. (You could fill the inside with peppermint candies or any other Christmas candy instead of using a candle.)


The Garland

This one again uses a jar candle in the center, and just has a string of Christmas bead garland coiled inside the dish.


The Christmas Balls


This one is so festive! I love it. I have all sorts of ways to use Christmas balls (stay tuned!). They are so versatile and I have so many (too many??)  that I have collected over the years. I love to get these at thrift stores because I can often find the vintage ones which are still made of delicate glass (not plastic) and come in so many sizes and colors. You can use any Christmas balls you have around, but the smaller ones will be easier to use for this. The larger ones don't fit between the candle and the side of the bowl as well.


The Natural


This one is for a more natural, out-doorsy look. It can be tricky unless you have medium and small pine cones(a mixture including tiny ones would be great) . Again, this is so simple.. put pine cones around your candle. Or you could even pile the pine cones in the dish without a candle. ( Do be careful as pine cones can catch on fire if the flame touches them. )


Are your creative juices flowing? Start your hunt! Get out your Christmas boxes; look around your kitchen; find things that you can use creatively to make your house ready for the holidays. Have fun!